728x90
in-app-browser 스크롤 허용 방법
열심히 in-app-browser를 이용해서 웹사이트를 띄웠는데
스크롤이 되지 않았습니다.
그래서 구글링을 해보니 ScrollEnabled가 false로 되어있는 것을 발견했습니다.
config.xml에서 true로 변경해줍니다.
<!-- allow scroll -->
    <preference name="ScrollEnabled" value="true" />
[ config.xml ] 전체 코드
<?xml version='1.0' encoding='utf-8'?>
<widget id="io.ionic.starter" version="0.0.1" xmlns="http://www.w3.org/ns/widgets" xmlns:cdv="http://cordova.apache.org/ns/1.0">
    <name>MyApp3</name>
    <description>An awesome Ionic/Cordova app.</description>
    <author email="hi@ionicframework.com" href="http://ionicframework.com/">Ionic Framework Team</author>
    <content src="index.html" />
    <access origin="*" />
    <allow-intent href="http://*/*" />
    <allow-intent href="https://*/*" />
    <allow-intent href="tel:*" />
    <allow-intent href="sms:*" />
    <allow-intent href="mailto:*" />
    <allow-intent href="geo:*" />
    <!-- _self : allow all website(*) -->
    <allow-navigation href="*" />
    <!-- allow scroll -->
    <preference name="ScrollEnabled" value="true" />
    <preference name="android-minSdkVersion" value="19" />
    <preference name="BackupWebStorage" value="none" />
    <preference name="SplashMaintainAspectRatio" value="true" />
    <preference name="FadeSplashScreenDuration" value="300" />
    <preference name="SplashShowOnlyFirstTime" value="false" />
    <preference name="SplashScreen" value="screen" />
    <preference name="SplashScreenDelay" value="3000" />
    <platform name="android">
        <edit-config file="app/src/main/AndroidManifest.xml" mode="merge" target="/manifest/application" xmlns:android="http://schemas.android.com/apk/res/android">
            <application android:networkSecurityConfig="@xml/network_security_config" />
        </edit-config>
        <resource-file src="resources/android/xml/network_security_config.xml" target="app/src/main/res/xml/network_security_config.xml" />
        <allow-intent href="market:*" />
        <icon density="ldpi" src="resources/android/icon/drawable-ldpi-icon.png" />
        <icon density="mdpi" src="resources/android/icon/drawable-mdpi-icon.png" />
        <icon density="hdpi" src="resources/android/icon/drawable-hdpi-icon.png" />
        <icon density="xhdpi" src="resources/android/icon/drawable-xhdpi-icon.png" />
        <icon density="xxhdpi" src="resources/android/icon/drawable-xxhdpi-icon.png" />
        <icon density="xxxhdpi" src="resources/android/icon/drawable-xxxhdpi-icon.png" />
        <splash density="land-ldpi" src="resources/android/splash/drawable-land-ldpi-screen.png" />
        <splash density="land-mdpi" src="resources/android/splash/drawable-land-mdpi-screen.png" />
        <splash density="land-hdpi" src="resources/android/splash/drawable-land-hdpi-screen.png" />
        <splash density="land-xhdpi" src="resources/android/splash/drawable-land-xhdpi-screen.png" />
        <splash density="land-xxhdpi" src="resources/android/splash/drawable-land-xxhdpi-screen.png" />
        <splash density="land-xxxhdpi" src="resources/android/splash/drawable-land-xxxhdpi-screen.png" />
        <splash density="port-ldpi" src="resources/android/splash/drawable-port-ldpi-screen.png" />
        <splash density="port-mdpi" src="resources/android/splash/drawable-port-mdpi-screen.png" />
        <splash density="port-hdpi" src="resources/android/splash/drawable-port-hdpi-screen.png" />
        <splash density="port-xhdpi" src="resources/android/splash/drawable-port-xhdpi-screen.png" />
        <splash density="port-xxhdpi" src="resources/android/splash/drawable-port-xxhdpi-screen.png" />
        <splash density="port-xxxhdpi" src="resources/android/splash/drawable-port-xxxhdpi-screen.png" />
    </platform>
    <platform name="ios">
        <allow-intent href="itms:*" />
        <allow-intent href="itms-apps:*" />
        <icon height="57" src="resources/ios/icon/icon.png" width="57" />
        <icon height="114" src="resources/ios/icon/icon@2x.png" width="114" />
        <icon height="29" src="resources/ios/icon/icon-small.png" width="29" />
        <icon height="58" src="resources/ios/icon/icon-small@2x.png" width="58" />
        <icon height="87" src="resources/ios/icon/icon-small@3x.png" width="87" />
        <icon height="20" src="resources/ios/icon/icon-20.png" width="20" />
        <icon height="40" src="resources/ios/icon/icon-20@2x.png" width="40" />
        <icon height="60" src="resources/ios/icon/icon-20@3x.png" width="60" />
        <icon height="48" src="resources/ios/icon/icon-24@2x.png" width="48" />
        <icon height="55" src="resources/ios/icon/icon-27.5@2x.png" width="55" />
        <icon height="29" src="resources/ios/icon/icon-29.png" width="29" />
        <icon height="58" src="resources/ios/icon/icon-29@2x.png" width="58" />
        <icon height="87" src="resources/ios/icon/icon-29@3x.png" width="87" />
        <icon height="40" src="resources/ios/icon/icon-40.png" width="40" />
        <icon height="80" src="resources/ios/icon/icon-40@2x.png" width="80" />
        <icon height="120" src="resources/ios/icon/icon-40@3x.png" width="120" />
        <icon height="88" src="resources/ios/icon/icon-44@2x.png" width="88" />
        <icon height="50" src="resources/ios/icon/icon-50.png" width="50" />
        <icon height="100" src="resources/ios/icon/icon-50@2x.png" width="100" />
        <icon height="60" src="resources/ios/icon/icon-60.png" width="60" />
        <icon height="120" src="resources/ios/icon/icon-60@2x.png" width="120" />
        <icon height="180" src="resources/ios/icon/icon-60@3x.png" width="180" />
        <icon height="72" src="resources/ios/icon/icon-72.png" width="72" />
        <icon height="144" src="resources/ios/icon/icon-72@2x.png" width="144" />
        <icon height="76" src="resources/ios/icon/icon-76.png" width="76" />
        <icon height="152" src="resources/ios/icon/icon-76@2x.png" width="152" />
        <icon height="167" src="resources/ios/icon/icon-83.5@2x.png" width="167" />
        <icon height="172" src="resources/ios/icon/icon-86@2x.png" width="172" />
        <icon height="196" src="resources/ios/icon/icon-98@2x.png" width="196" />
        <icon height="1024" src="resources/ios/icon/icon-1024.png" width="1024" />
        <splash height="480" src="resources/ios/splash/Default~iphone.png" width="320" />
        <splash height="960" src="resources/ios/splash/Default@2x~iphone.png" width="640" />
        <splash height="1024" src="resources/ios/splash/Default-Portrait~ipad.png" width="768" />
        <splash height="768" src="resources/ios/splash/Default-Landscape~ipad.png" width="1024" />
        <splash height="1125" src="resources/ios/splash/Default-Landscape-2436h.png" width="2436" />
        <splash height="1242" src="resources/ios/splash/Default-Landscape-736h.png" width="2208" />
        <splash height="2048" src="resources/ios/splash/Default-Portrait@2x~ipad.png" width="1536" />
        <splash height="1536" src="resources/ios/splash/Default-Landscape@2x~ipad.png" width="2048" />
        <splash height="2732" src="resources/ios/splash/Default-Portrait@~ipadpro.png" width="2048" />
        <splash height="2048" src="resources/ios/splash/Default-Landscape@~ipadpro.png" width="2732" />
        <splash height="1136" src="resources/ios/splash/Default-568h@2x~iphone.png" width="640" />
        <splash height="1334" src="resources/ios/splash/Default-667h.png" width="750" />
        <splash height="2208" src="resources/ios/splash/Default-736h.png" width="1242" />
        <splash height="2436" src="resources/ios/splash/Default-2436h.png" width="1125" />
        <splash height="2732" src="resources/ios/splash/Default@2x~universal~anyany.png" width="2732" />
        <icon height="216" src="resources/ios/icon/icon-108@2x.png" width="216" />
        <splash height="2688" src="resources/ios/splash/Default-2688h~iphone.png" width="1242" />
        <splash height="1242" src="resources/ios/splash/Default-Landscape-2688h~iphone.png" width="2688" />
        <splash height="1792" src="resources/ios/splash/Default-1792h~iphone.png" width="828" />
        <splash height="828" src="resources/ios/splash/Default-Landscape-1792h~iphone.png" width="1792" />
    </platform>
    <plugin name="cordova-plugin-whitelist" spec="1.3.3" />
    <plugin name="cordova-plugin-statusbar" spec="2.4.2" />
    <plugin name="cordova-plugin-device" spec="2.0.2" />
    <plugin name="cordova-plugin-splashscreen" spec="5.0.2" />
    <plugin name="cordova-plugin-ionic-webview" spec="^4.0.0" />
    <plugin name="cordova-plugin-ionic-keyboard" spec="^2.0.5" />
</widget>
반응형
'mac린이' 카테고리의 다른 글
| [ mac ] Terminal(터미널) 이용 해서 Xcode 열기 (0) | 2020.08.04 |
|---|---|
| [ ios ] Error: EACCES: permission denied, access '/usr/local/lib/node_modules' (0) | 2020.07.31 |
| [ ios ] VMware mac에서 아이폰 인식 안됨 (0) | 2020.07.29 |
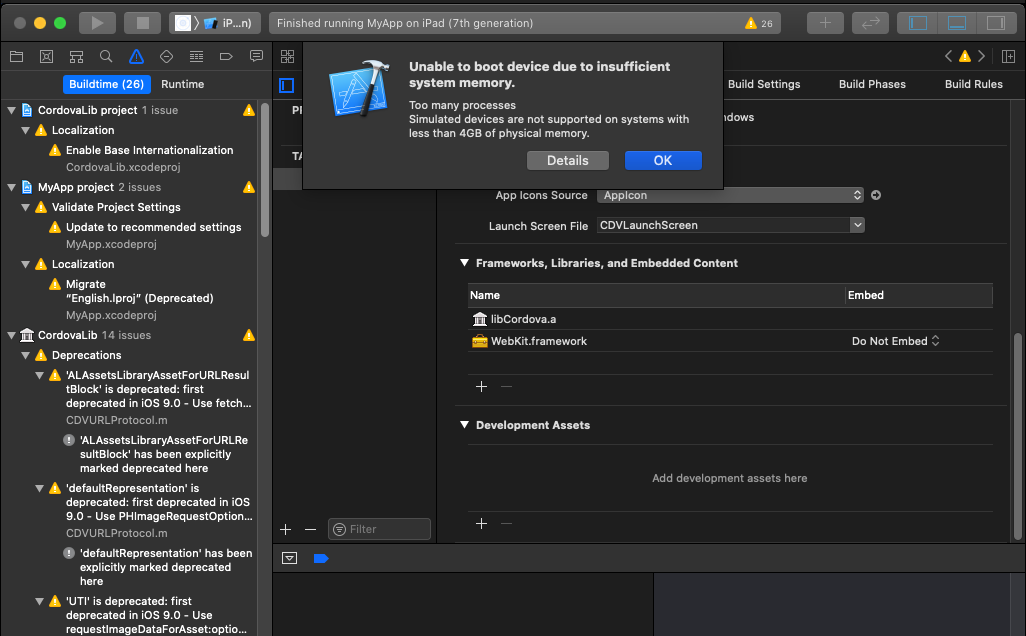
| [ ios ] Unable to boot device due to insufficient system memory (Xcode) (0) | 2020.07.28 |
| [ ios ] ionic 프로젝트 실제 아이폰에서 실행하기 , 신뢰 하지 않는 개발자 (0) | 2020.07.28 |